A very feminine mohair cardi with ribbed sleeves, an all over eyelet pattern and a crocheted edging.
.JPG)
To fit bust 32 inch (81 cm)
Actual bust measurement – 34 inches (86 cm)
Length – 18 inches (45 cm)
Sleeve seam – 17.5 inches (44 cm)
Requirements
7 x 50g balls of DK mohair yarn. I used Sublime Angora Merino (120 m / 130 yards per ball). Unfortunately this yarn is now discontinued.
4mm and 3.25 mm knitting needles
3.5 mm crochet hook
8 buttons
Tension
21 sts and 30 rows to 10 cm (4 inches) measured over pattern.
Abbreviations
k = knitp = purlsts = stitchestog = togethertbl = through back of loopsyon =yarn over needle
alt = alt
dec = decRS = right side
WS = wrong side
dc = double crochet (US = single crochet)
ch = chain
BACK
With 4mm needles, cast on 89 sts.
Work in garter st for 4 rows.
Beginning with a knit row, stocking st 2 rows.
Commence eyelet pattern, working 12 row repeat 6 times.
Eyelet pattern
Row 1: k2, (K1, k2tog, yon, k5) repeat to last 7 sts, k1, k2tog, yon, k4.
Row 2 and all even rows: purl
Row 3: k2, (k2tog, yon, k twice into next st, yon, k2tog tbl, k3) repeat to last 7 sts, k2tog, yon, k twice into next st, yon, k2tog tbl, k2.
Row 5: k2, (k1, k2tog tbl, yon, k2tog, k4) repeat to last 8 sts, k1, k2tog tbl, yon, k2tog, k3.
Row 7: k6, (K1, k2tog, yon, k5) repeat to last 3 sts, k3.
Row 9: k6, (k2tog, yon, k twice into next st, yon, k2tog tbl, k3) repeat to last 3 sts, k3.
Row 11: k6, (k1, k2tog tbl, yon, k2tog, k4) repeat to last 3 sts, k3.
Row 12: purl.
Important Note: The number of stitches increases on rows 3, 4, 9 and 10. This should be taken into account when counting stitches.
Work should measure 25.5 cm.
Shape armholes
Keeping pattern correct, cast off 4 sts at beg of next 2 rows.
Dec 1 st at each end of next 5 rows.
Dec 1 st at each end of next 2 alt rows. 67 sts.
Continue straight until armhole measures 18cm, ending with a WS row.
Shape shoulders and back neck
Cast off 5 sts at beg of next 2 rows.
Cast off 5 sts at beg of next row, pattern until there are 9 sts on right hand needle, turn, leaving remaining sts on a holder. Working on 9 sts only, cast off 4 sts at beg of next row. Cast off remaining 5 sts.
Leave central 29 sts on holder for back neck, with RS facing rejoin yarn to remaining 14 sts, pattern to end.
Cast off 5 sts at beg of next row.
Cast off 4 sts at beg of next row.
Cast off remaining 5 sts.
LEFT FRONT
With 4mm needles, cast on 45 sts.
Work in garter st for 4 rows.
Beginning with a knit row, stocking st 2 rows.
Commence eyelet pattern, working the 12 row repeat 6 times in total.
Eyelet pattern
Row 1: k2, (K1, k2tog, yon, k5) repeat to last 3 sts, k3.
Row 2 and all even rows: purl
Row 3: k2, (k2tog, yon, k twice into next st, yon, k2tog tbl, k3) repeat to last 3 sts, k3.
Row 5: k2, (k1, k2tog tbl, yon, k2tog, k4) repeat to last 3 sts, k3.
Row 7: k6, (K1, k2tog, yon, k5) repeat to last 7 sts, k1, k2tog, yon, k4.
Row 9: k6, (k2tog, yon, k twice into next st, yon, k2tog tbl, k3) repeat to last 7 sts, k2tog, yon, k twice into next st, yon, k2tog tbl, k2.
Row 11: k6, (k1, k2tog tbl, yon, k2tog, k4) repeat to last 8 sts, k1, k2tog tbl, yon, k2tog, k3.
Row 12: purl.
Work should measure same as back to start of armholes.
Shape armholes
Cast off 4 sts at beginning of next row.
Work 1 row.
Dec 1 st at armhole edge on next 5 rows.
Dec 1 st at armhole edge on next 2 alt rows.
Work until 16 rows less than back to start of shoulder shaping have been completed, ending with a WS row.
Shape neck
Pattern to last 14 sts and turn. Leave these 14 sts on a holder for neckband. 20 sts.
Dec 1 st at neck edge on next 4 rows. 16sts.
Dec 1 st at neck edge on following alt row. 15 sts.
Work 9 rows straight.
Shoulder shaping
Cast off 5 sts at beginning of next and 2 following alt rows.
RIGHT FRONT
With 4mm needles, cast on 45 sts.
Work in garter st for 4 rows.
Beginning with a knit row, stocking st 2 rows.
Commence eyelet pattern, working the 12 row repeat 6 times in total.
Eyelet pattern
Row 1: k6, (K1, k2tog, yon, k5) repeat to last 7 sts, k1, k2tog, yon, k4.
Row 2 and all even rows: purl
Row 3: k6, (k2tog, yon, k twice into next st, yon, k2tog tbl, k3) repeat to last 7 sts, k2tog, yon, k twice into next st, yon, k2tog tbl, k2.
Row 5: k6, (k1, k2tog tbl, yon, k2tog, k4) repeat to last 8 sts, k1, k2tog tbl, yon, k2tog, k3.
Row 7: k2, (K1, k2tog, yon, k5) repeat to last 3 sts, k3.
Row 9: k2, (k2tog, yon, k twice into next st, yon, k2tog tbl, k3) repeat to last 3 sts, k3.
Row 11: k2, (k1, k2tog tbl, yon, k2tog, k4) repeat to last 3 sts, k3.
Row 12: purl.
Work should measure same as back to start of armholes.
Shape armholes
Work 1 row.
Cast off 4 sts at beginning of next row.
Dec 1 st at armhole edge on next 5 rows.
Dec 1 st at armhole edge on next 2 alt rows.
Work until 15 rows less than back to start of shoulder shaping have been completed, ending with a RS row.
Shape neck
Pattern to last 14 sts and turn. Leave these 14 sts on a holder for neckband. 20 sts.
Dec 1 st at neck edge on next 4 rows. 16sts.
Dec 1 st at neck edge on following alt row. 15 sts.
Work 9 rows straight.
Shoulder shaping
Cast off 5 sts at beginning of next and 2 following alt rows.
.JPG)
SLEEVES
Cast on 46 sts using 3.25 mm needles.
Row 1: (k2, p2) to last 2 sts, k2,
Row 2: (p2, k2) to last 2 sts, p2.
Repeating these 2 rows work a total of 10 rows.
Continuing in 2x2 rib as set, change to 4 mm needles and increase 1 st at each end of next and 9 following 10th rows. 66 sts.
Continue without shaping until sleeve measures 40 cm ending with a WS row.
Next row, k13 (inc in next st, k12) 3 times, inc in next st, k13. 70 sts.
Purl 1 row.
Commence eyelet pattern as follows, working only 1 pattern repeat:-
Row 1: k5, (K1, k2tog, yon, k5) repeat to last 9 sts, k1, k2tog, yon, k6.
Row 2 and all even rows: purl
Row 3: k5, (k2tog, yon, k twice into next st, yon, k2tog tbl, k3) repeat to last 9 sts, k2tog, yon, k twice into next st, yon, k2tog tbl, k4.
Row 5: k5, (k1, k2tog tbl, yon, k2tog, k4) repeat to last 10 sts, k1, k2tog tbl, yon, k2tog, k5.
Row 7: k9, (K1, k2tog, yon, k5) repeat to last 5 sts, k5.
Row 9: k9, (k2tog, yon, k twice into next st, yon, k2tog tbl, k3) repeat to last 5 sts, k5.
Row 11: k9, (k1, k2tog tbl, yon, k2tog, k4) repeat to last 5 sts, k5.
Row 12: purl.
Work should measure 44 cm.
Shape sleeve top
NB. Make sure only complete pattern repeats are worked.
Keeping eyelet pattern correct as set, cast off 4 sts at beg of next 2 rows. 62 sts.
Dec 1 st at each end of next 5 rows.
Dec 1 st at each end of 2 following alt rows.
Dec 1 st at each end of 4 following 4th rows. 40 sts.
Work 1 row, ending with a WS row.
Dec 1 st at each end of next row and 1 following alt row.
Dec 1 st at each end of 3 following rows. 30 sts.
Cast off remaining sts.
.JPG)
BUTTON BAND
With 3.25mm needles and RS facing, pick up and knit 76 sts along front edge of left front.
Knit 4 rows.
Cast off.
BUTTONHOLE BAND
With 3.25mm needles and RS facing, pick up and knit 76 sts along front edge of right front.
Knit 1 row.
Buttonhole row: K1, (k2tog, yon, k9) 6 times, k2tog, yon, k7.
Knit 2 more rows.
Cast off.
Join shoulder seams
NECKBAND
With 3.25mm needles and RS facing pick up and knit as follows:-
Pick up and knit 2 sts from top of right front buttonhole band,
Knit across 14 sts on holder,
Pick up and knit 16 sts from right front neck edge to shoulder,
Pick up and knit 4 sts from right back neck shaping,
Knit across 29 sts on holder for back,
Pick up and knit 4 sts from left back neck shaping,
Pick up and knit 16 sts from left front neck edge,
Knit across 14 sts on holder,
Pick up and knit 2 sts from top of left front button band. (101 sts)
Knit 1 row.
Buttonhole row: k1, k2tog, yon, k to end.
Knit 2 more rows.
Cast off.
Set in sleeves and join side seams.
.JPG)
CROCHET EDGINGS
Using 3.5 mm crochet hook and RS facing, dc (US = sc) around the hem.
Turn, 1 ch, 1 dc, (3 ch, 1 dc into next 3 dc) repeat to end.
Fasten off.
Repeat this edging for the neck edge.

Neaten all loose ends and attach buttons.

 I used up some Rowan Cashsoft DK I had left from a few years back. I only just made it - about 2 metres of yarn left at the end!
 My favourite is Isle. Simple design but interesting details.


.JPG)

.JPG)
.JPG)
.JPG)

.JPG)


.JPG)
.JPG) This pattern is called Naked Star and is by my friend Ira from the Ukraine. The pattern is available as a free Ravelry download and is very easy to make.
This pattern is called Naked Star and is by my friend Ira from the Ukraine. The pattern is available as a free Ravelry download and is very easy to make..JPG)
 The joy of Autumn and snug, warm sweaters.
 They are bright and cheerful and remind me of pizzas!
.JPG) I didn't knit during the final week of revision before my exam and it seems to be taking a while to get back into the swing of things. Today I feel like I'm back to normal. The Olive cardi is back on track and I've started more glittens. I'm also starting to plan my Christmas makes - yes, it's getting nearer!
I didn't knit during the final week of revision before my exam and it seems to be taking a while to get back into the swing of things. Today I feel like I'm back to normal. The Olive cardi is back on track and I've started more glittens. I'm also starting to plan my Christmas makes - yes, it's getting nearer!


.JPG)
.JPG)
 You can see details of the yarn used etc on my Ravelry page,
  The pattern is by Woolly Wormhead, and is available as a free Ravelry download.
.JPG) I love the colour of this hat and it is very easy to wear.
I love the colour of this hat and it is very easy to wear..JPG)
.JPG)
.JPG) I'm really pleased with the styling of the cardi. It is just what I had in mind when I originally drew up the design. The buttons make it extra special.
I'm really pleased with the styling of the cardi. It is just what I had in mind when I originally drew up the design. The buttons make it extra special..JPG) The yarn wasn't very pleasant to knit with - Sublime angora merino - it shed all the time and the fibres kept getting up my nose - but it is soooo soft and gorgeous to wear. A number of other people who have used this yarn have said that it settles down once it is knitted up - so I'm quite prepared to forgive it.
The yarn wasn't very pleasant to knit with - Sublime angora merino - it shed all the time and the fibres kept getting up my nose - but it is soooo soft and gorgeous to wear. A number of other people who have used this yarn have said that it settles down once it is knitted up - so I'm quite prepared to forgive it..JPG)
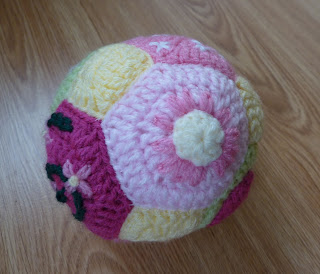
.JPG) The amount of embroidery and embellishment you want to incorporate in the project is entirely up to you. I decorated all the hexagons but left the squares blank.
The amount of embroidery and embellishment you want to incorporate in the project is entirely up to you. I decorated all the hexagons but left the squares blank..JPG) It is easiest to decorate the hexagons and squares before the ball is constructed.
It is easiest to decorate the hexagons and squares before the ball is constructed..JPG) The heart motif is also crocheted, as follows:
The heart motif is also crocheted, as follows:.JPG) The remaining decoration was all embroidered using DK yarn oddments. Anything goes. I’m particularly proud of the bee, which is made using bullion knots.
The remaining decoration was all embroidered using DK yarn oddments. Anything goes. I’m particularly proud of the bee, which is made using bullion knots. .JPG)
.JPG) Once decorated the ball is constructed in two halves around a central hexagon as per this diagram:
Once decorated the ball is constructed in two halves around a central hexagon as per this diagram:
 I hope you enjoy making this.